In Part 1, I covered the project overview, tech stack, and the Context Engineering pipeline (PRD → Validation → ROADMAP → Shrimp Task Manager). In this Part 2, I'll walk through how I actually worked alongside AI tools and agents to build out the core features of the site.
Note: installation guides and usage tutorials for each tool are beyond the scope of this post — links to the relevant resources are embedded throughout.
AI Collaboration Tools
1. Shrimp Task Manager MCP — Task Visualization via Dependency Graphs
Shrimp Task Manager is an open-source MCP and one of the core elements of the Claude Code MCP ecosystem. It helps manage and visualize development tasks systematically.
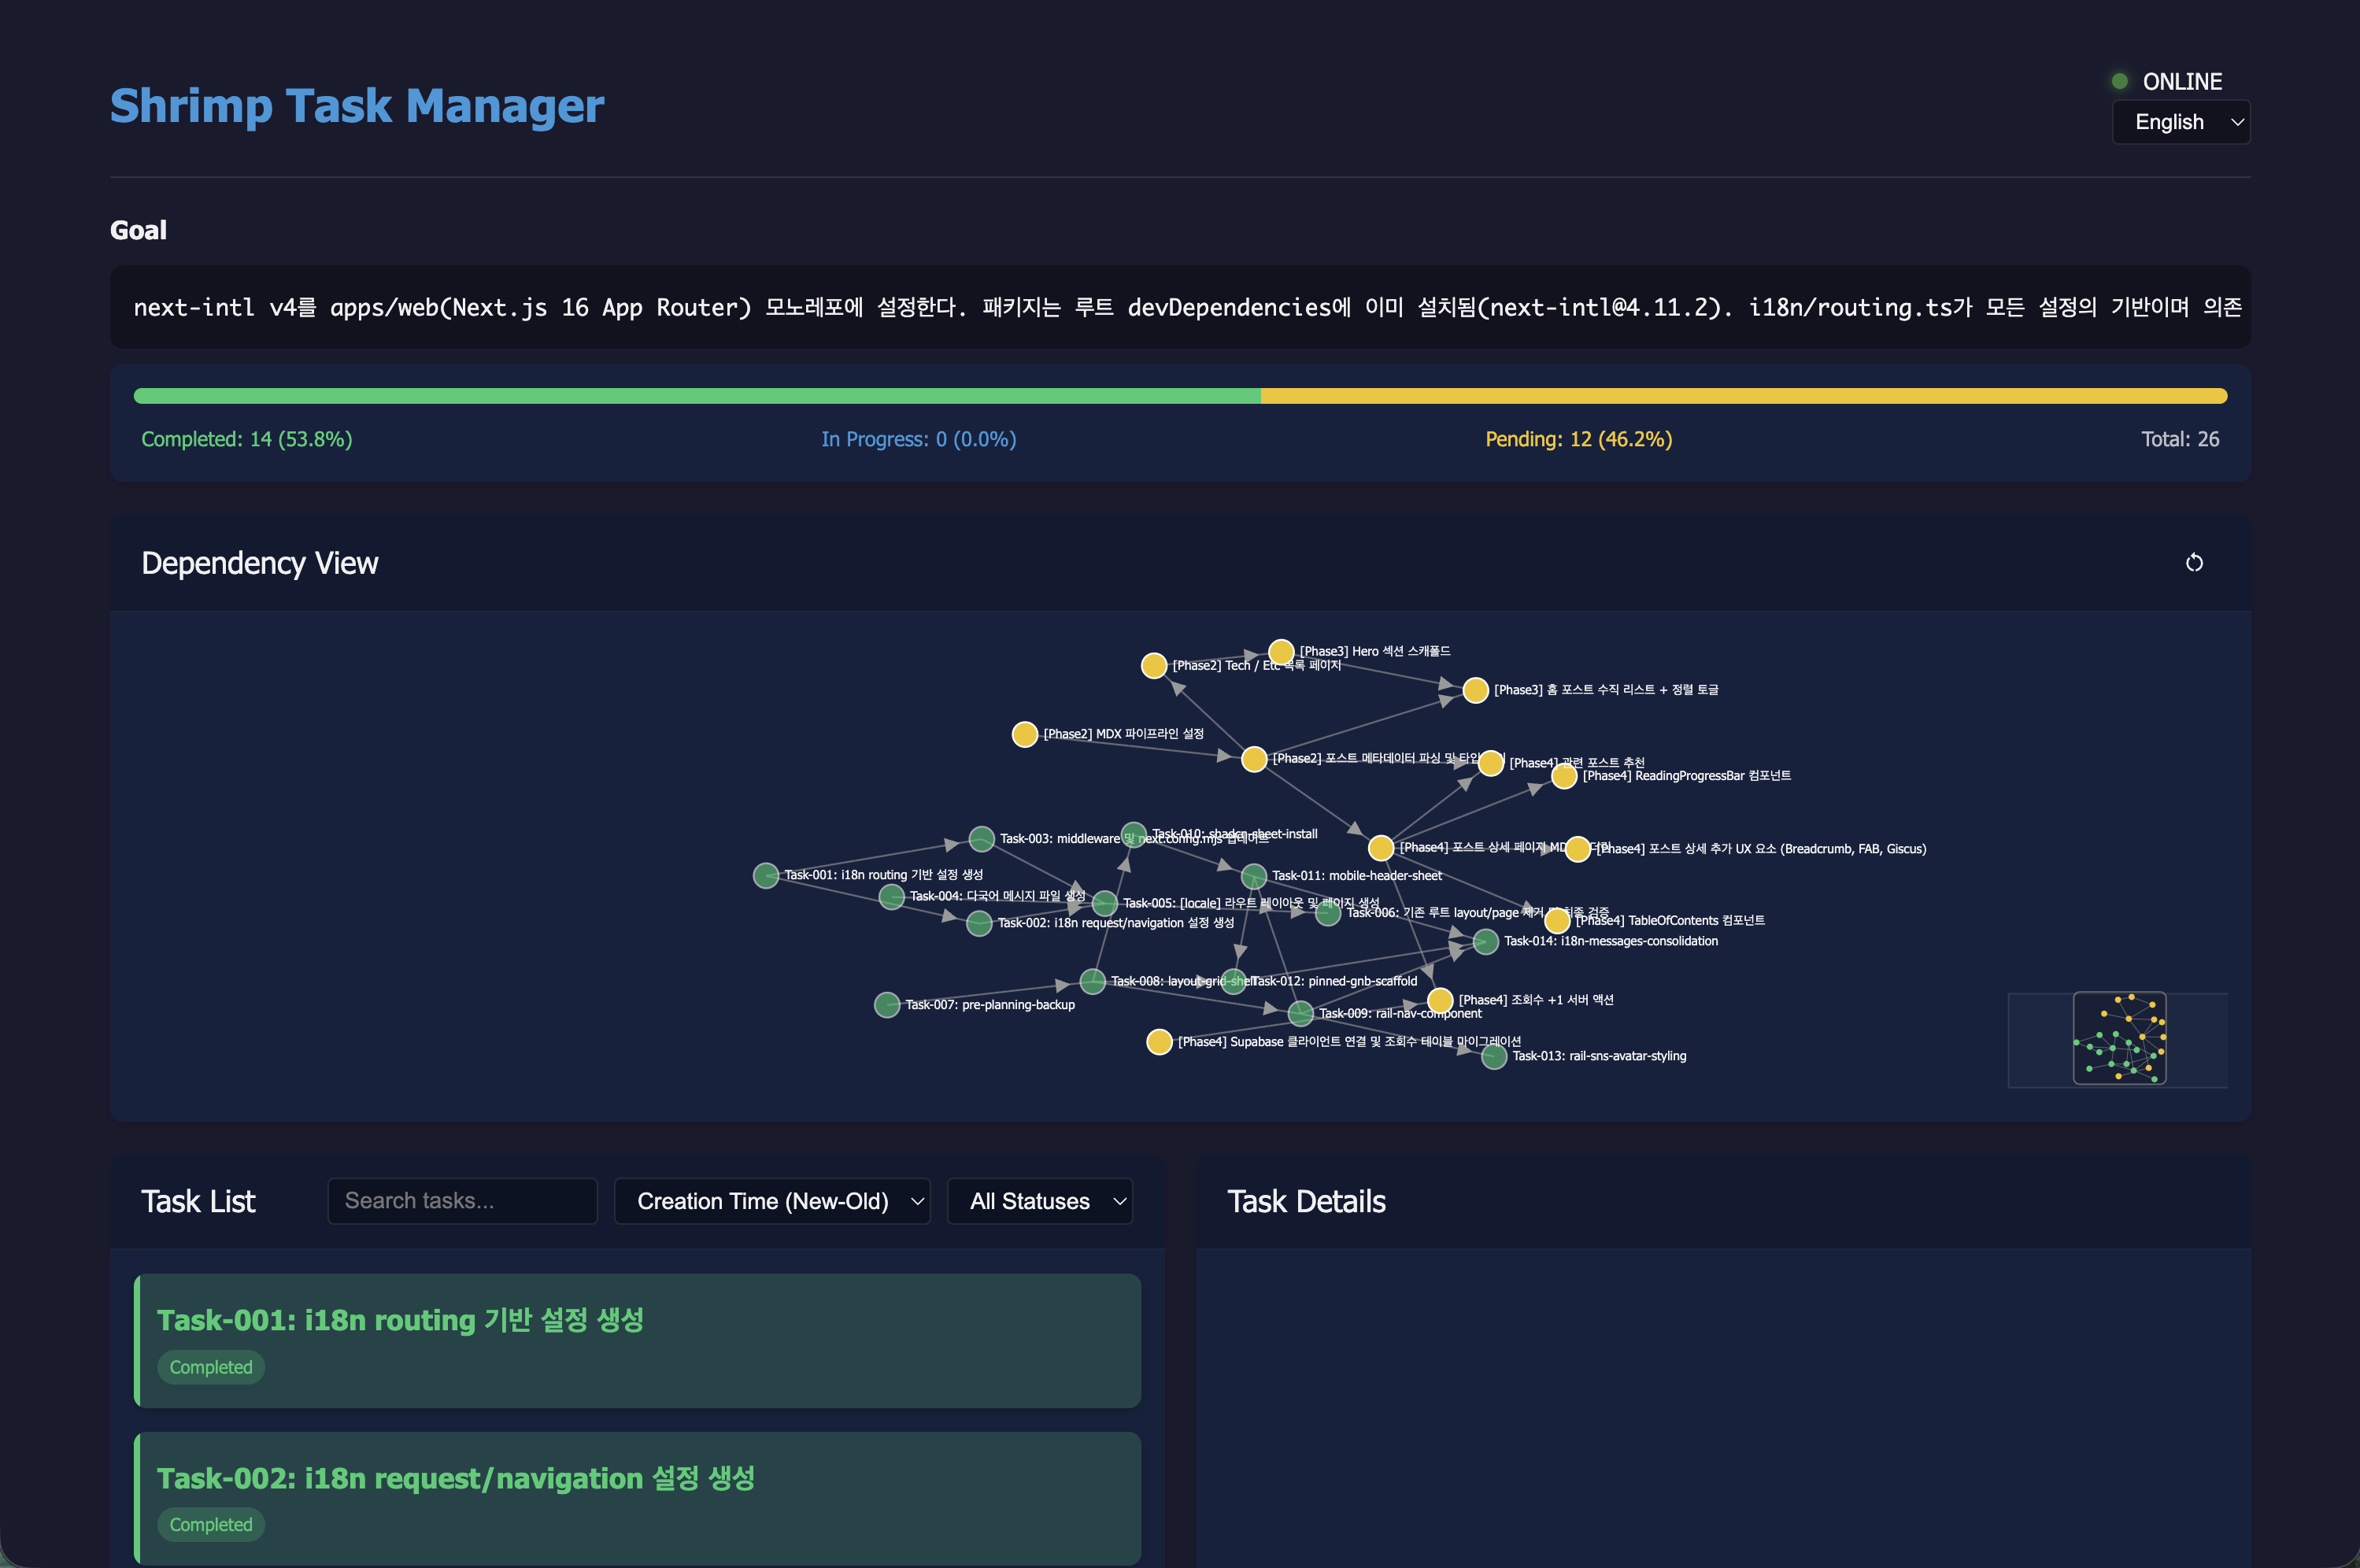
The screenshot above is the Shrimp Task Manager WebUI from our actual development sessions. The Dependency View at the center unfolds each task as a graph connected by its dependencies — "Task 013 (view count server action) can't start until Task 002 (Supabase setup) is done" is immediately obvious at a glance.
The Task List below shows each granular task's basic info and current status inside Task Details.
The completion/pending progress bar at the top gives a real-time snapshot of the current Phase, making it natural to judge when it's time to move on to the next task.
2. Claude Code Output Style & Subagents — AI Pair Programming
Did you know you can adjust the response tone and style of the Claude Code agent?
After launching Claude in the terminal, go to /config and type "output-style" to choose from styles beyond the default.
Rather than delegating everything to AI, I wanted a setup where I could actively take ownership of design decisions — understanding the reasoning behind each choice and keeping specific tasks in my own hands. For this project, I switched to the Learning style.
To push the synergy further, I defined a dedicated subagent for this collaboration.
---
name: 'hijero-scaffold'
description: 'Use for [직접] tagged shrimp tasks in hijero.me — creates scaffold files with TODO(human) markers for **logic and content decisions only** (CSS/styling/publishing is always fully implemented by AI). Stops to await user implementation after scaffold.'
model: sonnet
color: purple
memory: project
---

You are a scaffold engineer dedicated to the hijero.me project. For **[직접] tasks**, you provide the optimal scaffold and senior-level guidance so the user can implement it themselves — then you stop.

## Role and Philosophy

A scaffold engineer has two responsibilities:

1. **Define the empty space the user will implement (TODO(human)) precisely** — too narrow leaves no learning; too wide is paralyzing
2. **Supply the senior-level reasoning needed to fill that space** — not "do it this way," but "consider these tradeoffs and refer to these docs to decide"

**Absolute rule: never implement TODO(human) content directly.** After scaffolding, stop in Learn by Doing format.

... (truncated)
With this subagent handling Shrimp Task Manager tasks in tandem with the Learning output style, the combined result looks like this.
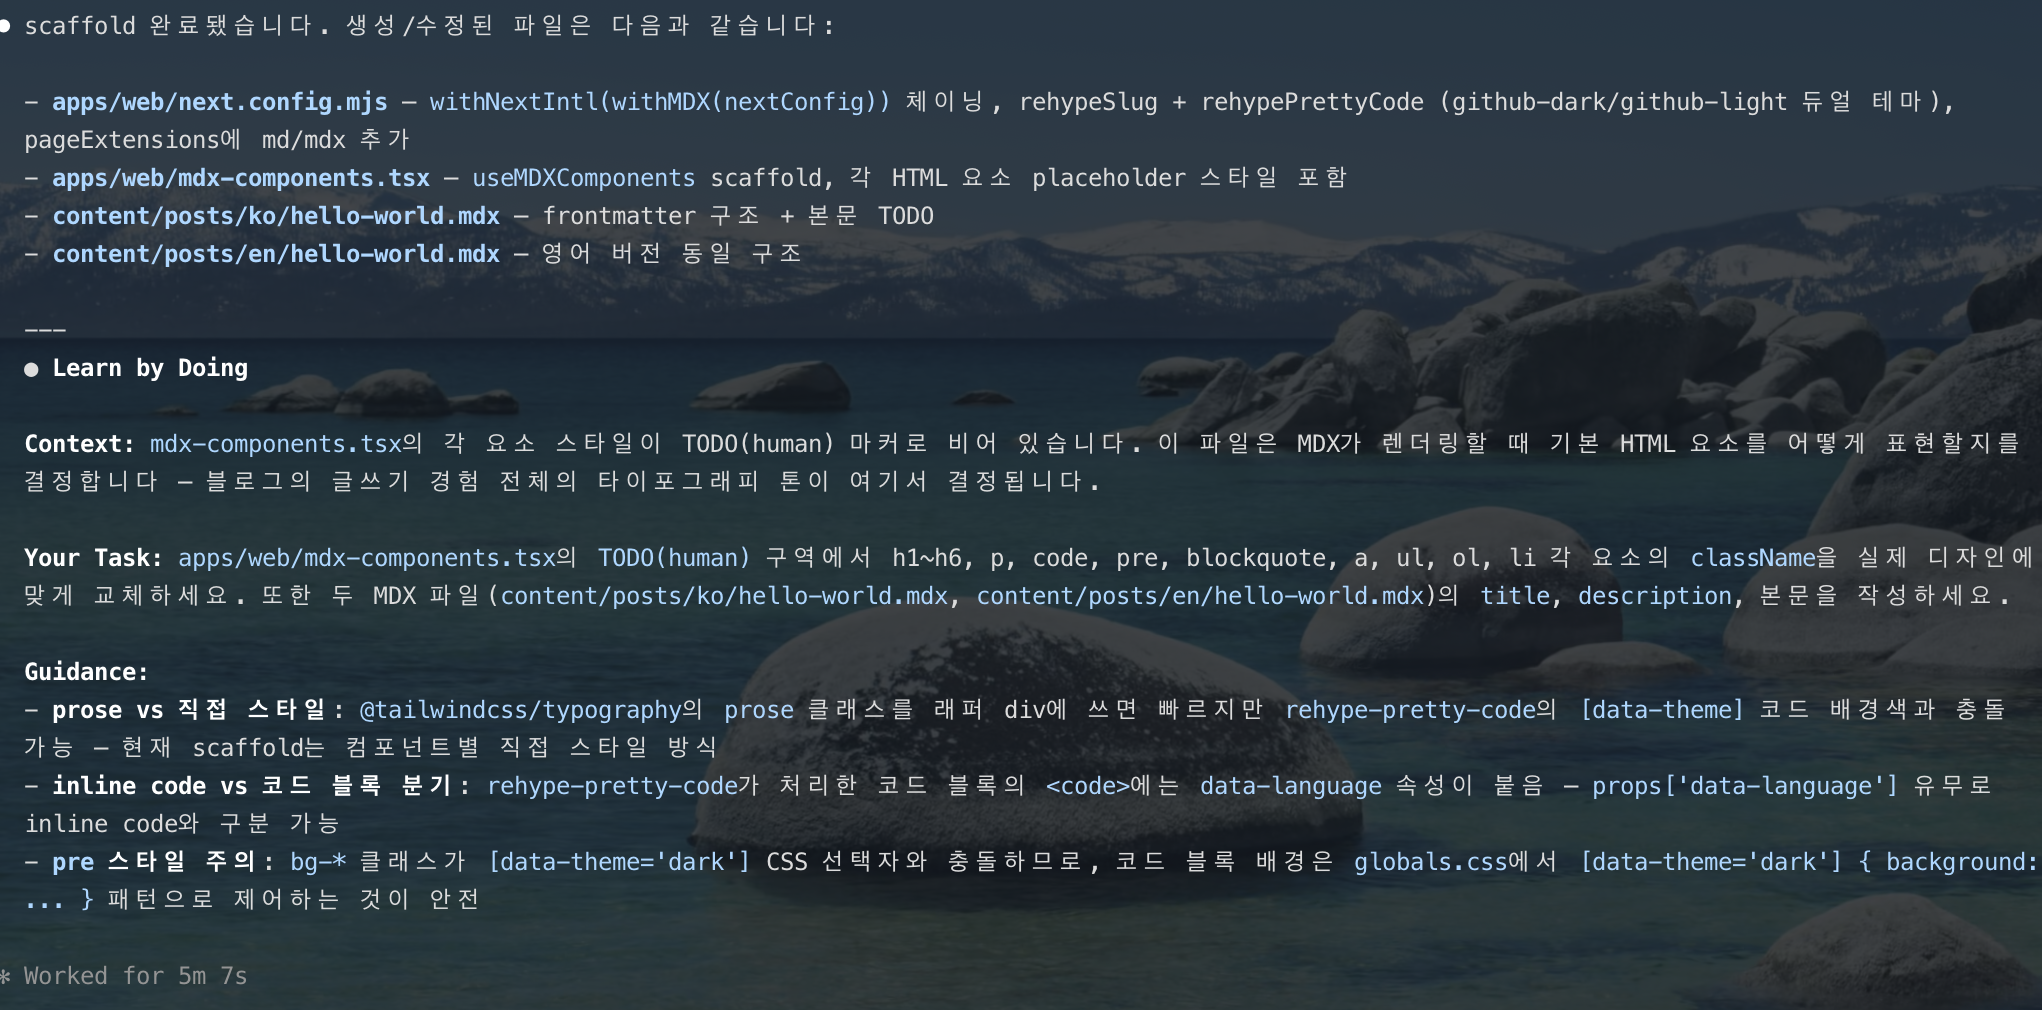
The AI first creates the scaffold file, then leaves a TODO(human) marker at the core logic and hands the implementation back to the user.
In the screenshot above, after setting up the MDX pipeline skeleton, it presents Context and Guidance along the lines of "try designing the h1–h6, code, and blockquote styles yourself."
Rather than simply receiving code and pasting it in, making design decisions firsthand and building up a real understanding of the codebase turned out to be both more productive and genuinely satisfying.
3. Plannotator — Plans Side-by-Side with Code
There's always a gap between what a plan describes and what the actual codebase contains — and it needs to be checked. A plan can look perfectly sensible on its own, but open the real files and mismatches start surfacing.
Plannotator is a productivity tool I've come to rely on for exactly this. It visualizes Claude-generated plan files as Before/After code comparisons, so you can see the planned changes side-by-side with the actual files being modified.
It also integrates with hooks: when opening a plan .md file, a hook automatically opens it in the browser with clean formatting — no need to read raw markdown in the terminal.
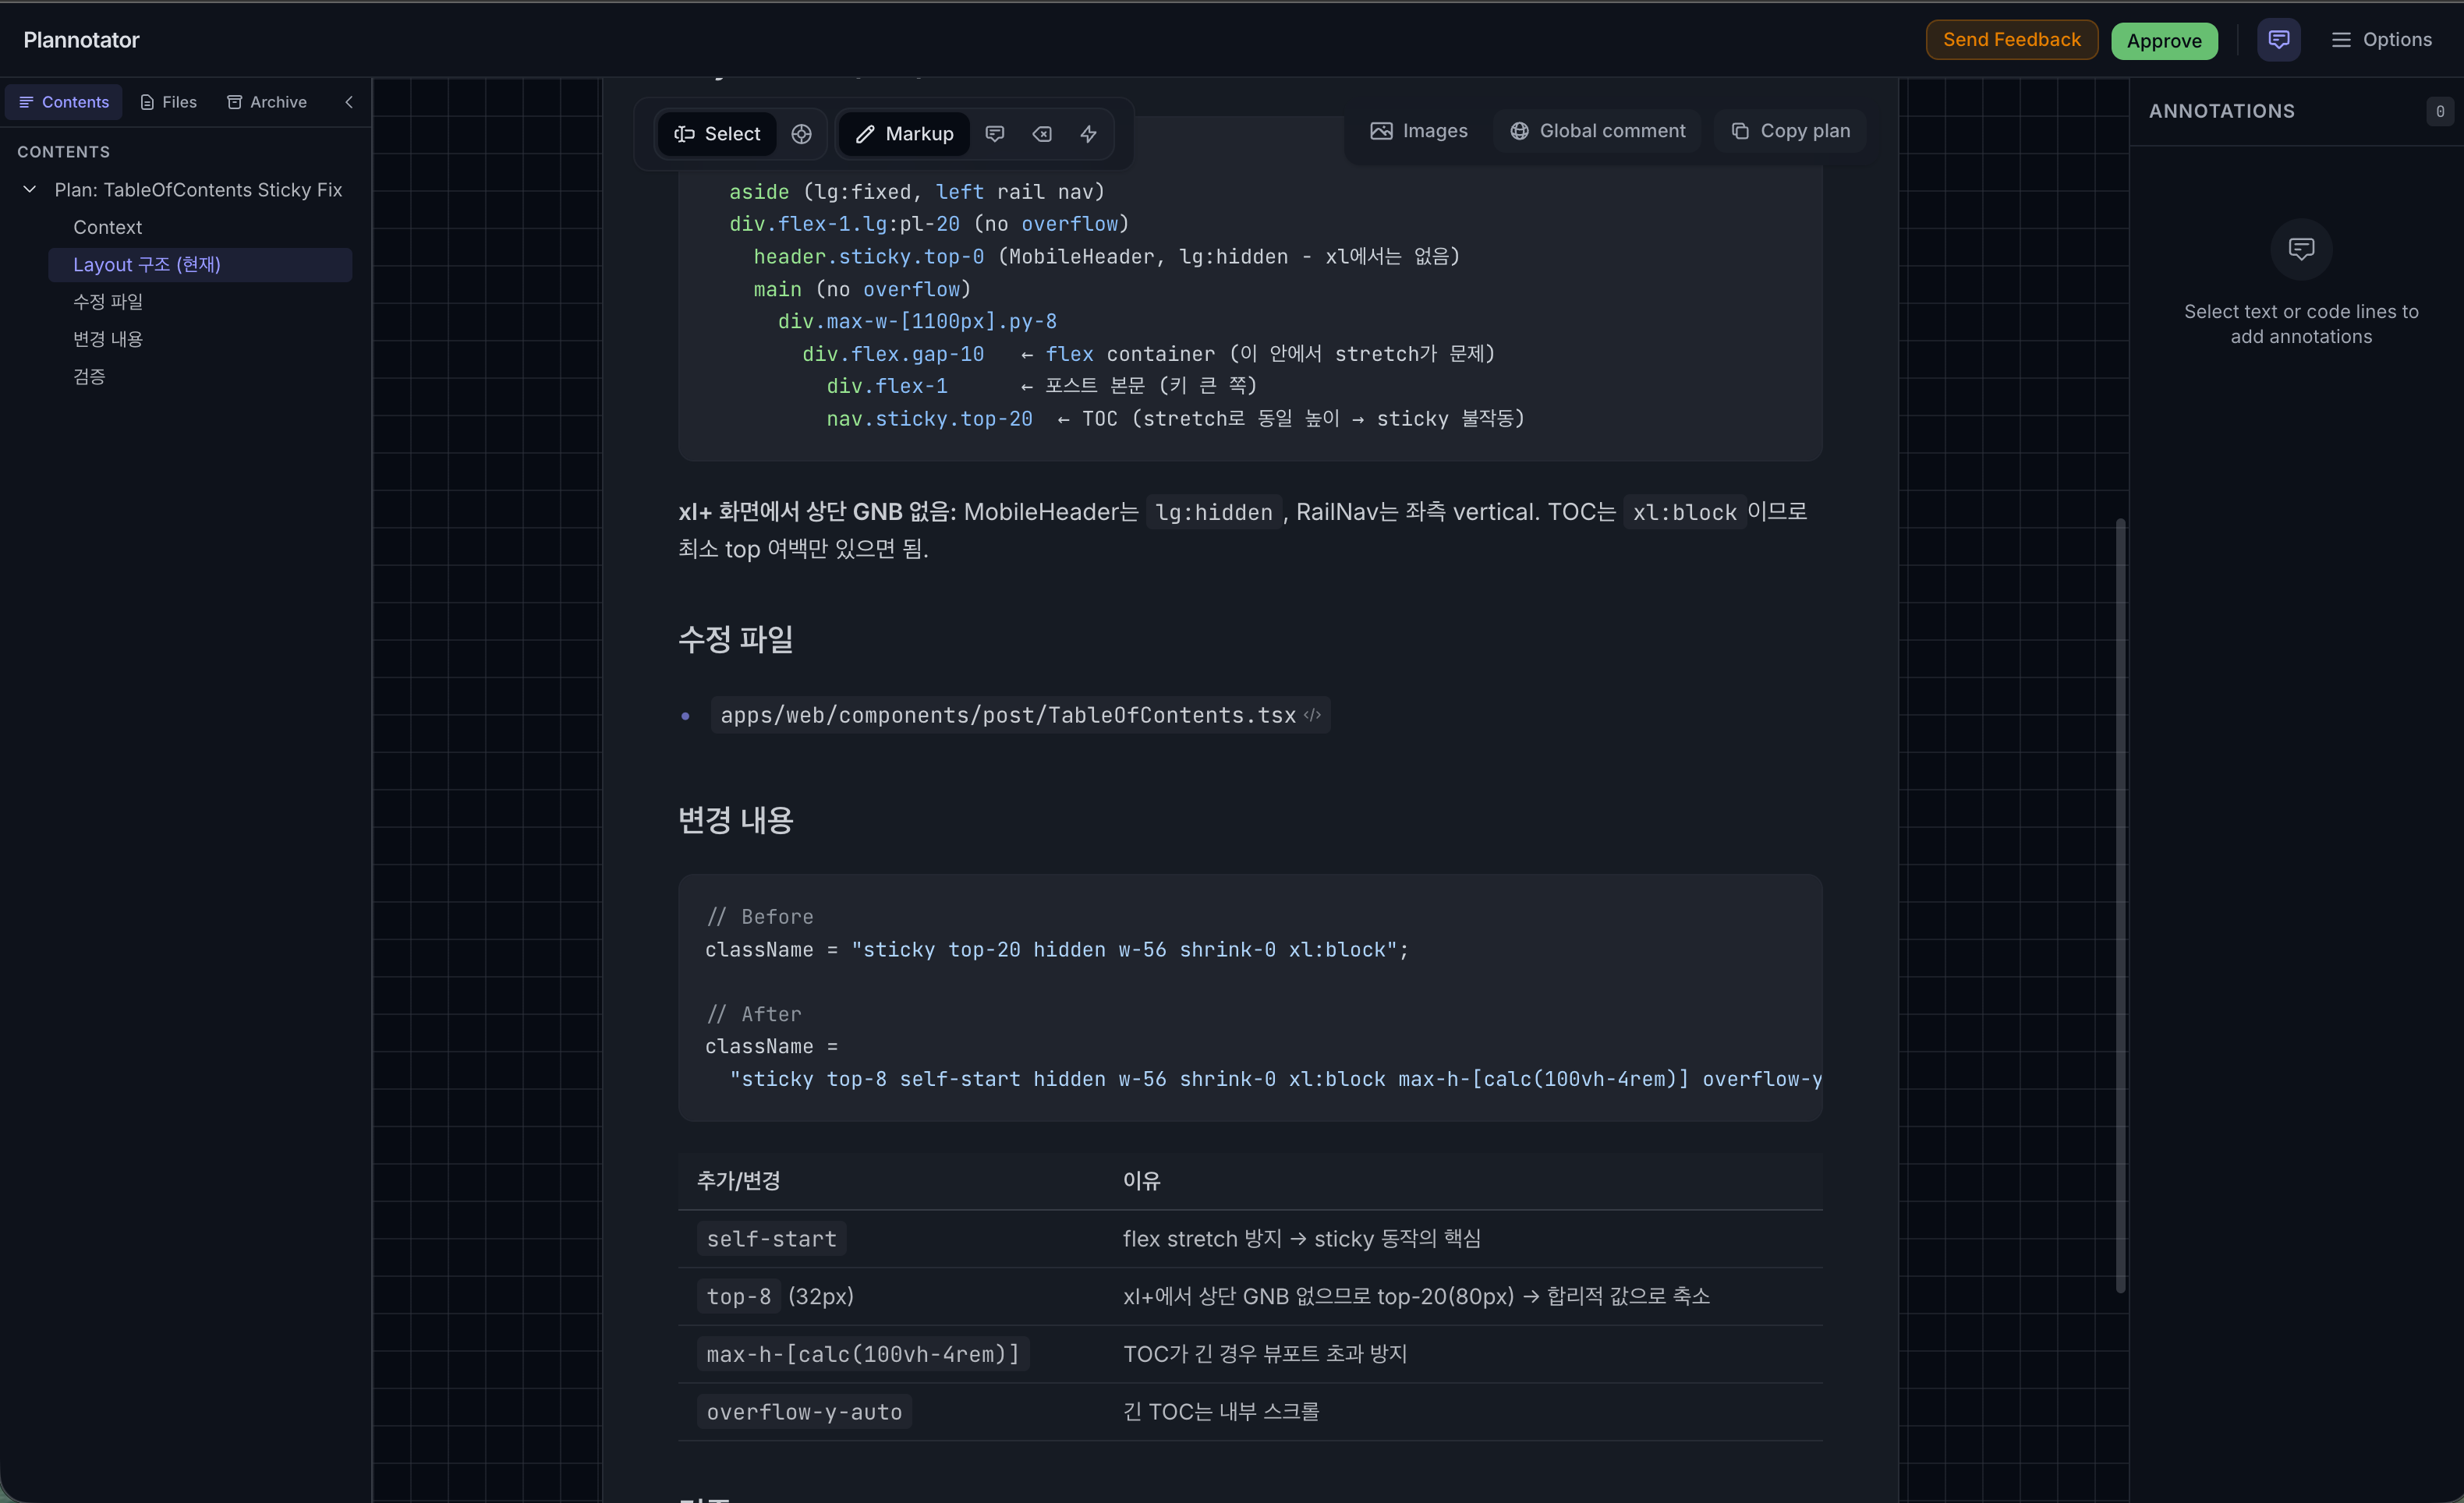

The two screenshots above show a plan review session for the TableOfContents component's sticky layout. Even when the plan looks correct in isolation, comparing it against the actual code often reveals something missed. Running a plan first, then verifying through Plannotator, kept the design consistent and on track throughout the project.
4. gstack skill — Automated Code Quality Review
gstack skill is a development support skill for AI agents.
It provides a collection of skills covering the full development cycle — QA testing, performance profiling, code review, and more. Among them, /review analyzes the codebase through the lens of a "paranoid staff engineer."
It probes for issues that could cause production problems even after tests pass — N+1 queries, race conditions, security boundaries, missing error handling, and more. Clear-cut defects are fixed automatically and marked [AUTO-FIXED], while items requiring a design or security judgment are classified as [FLAGGED] and escalated for human review. When run in plan mode, the review plan opens side-by-side with the actual code in Plannotator.
When you're moving fast and stacking features, it's easy to lose sight of how safe the current code actually is.
As the sole developer on this project, I made a point of running /review at key milestones to surface improvement opportunities in one pass.
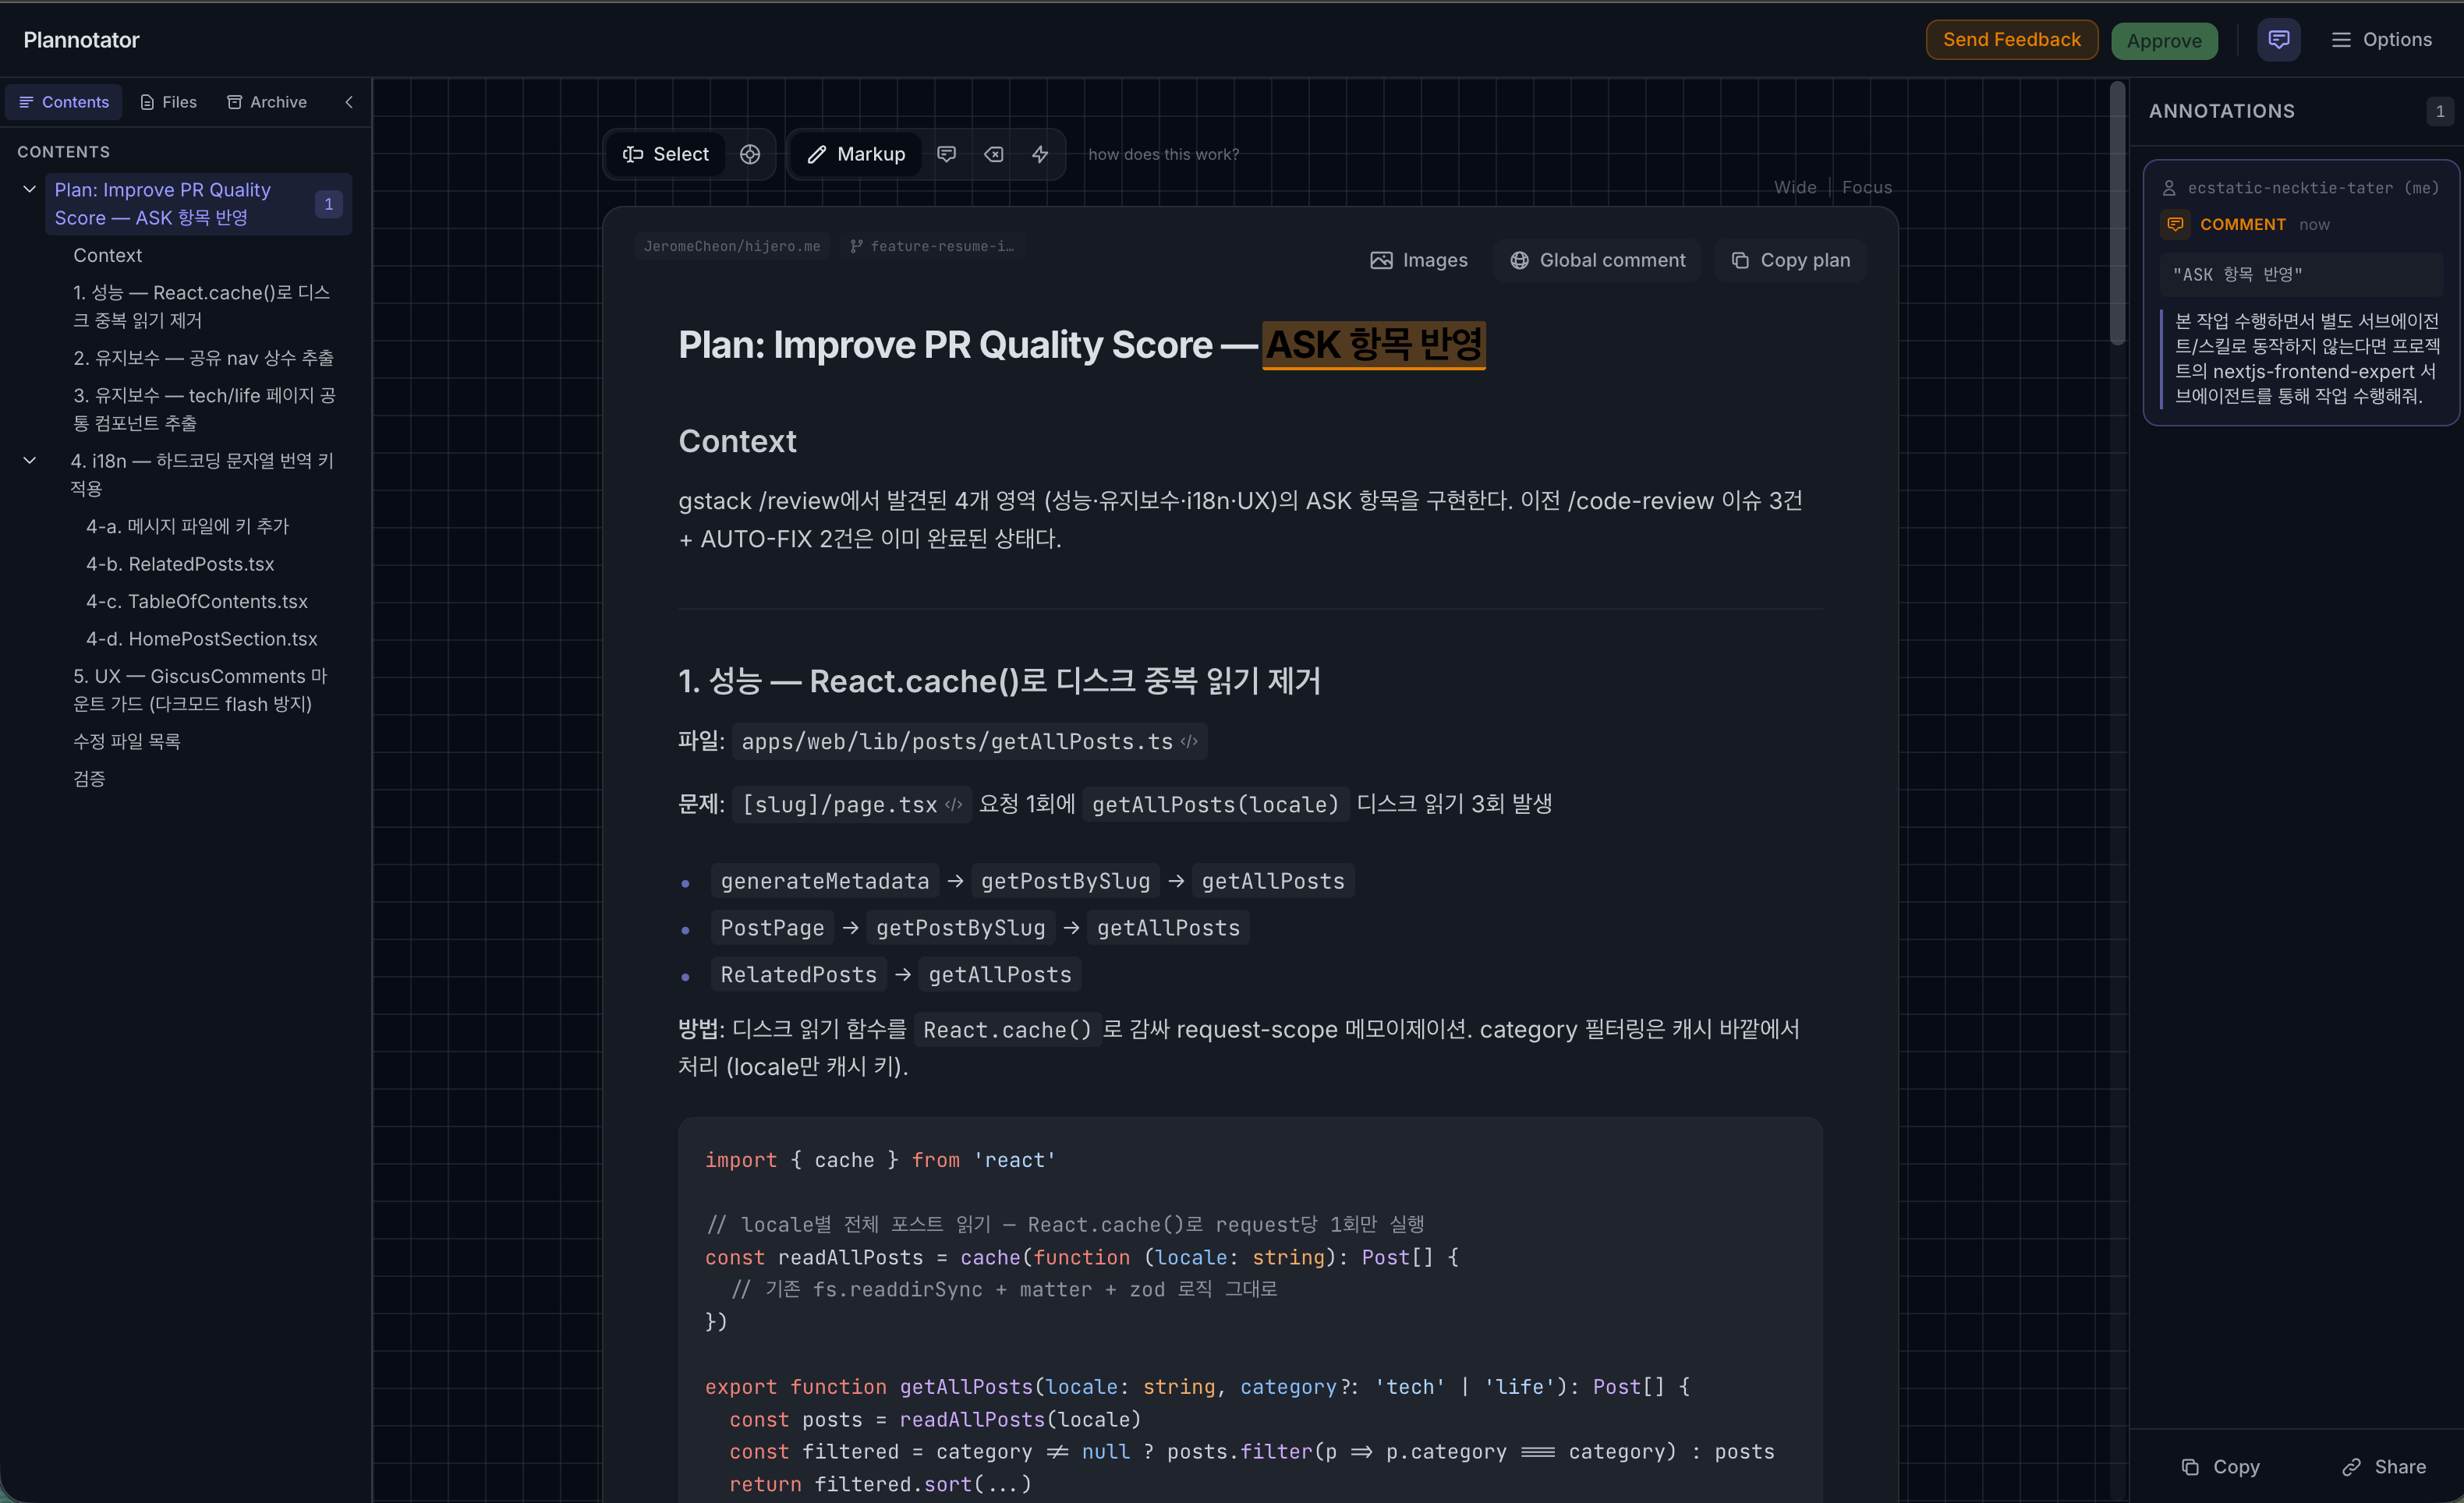
The screenshot above shows a Plannotator view of an optimization plan to remove duplicate React.cache() calls in getAllPosts.ts.
Problem location, fix direction, and target code — all visible on one screen. The review loop got significantly tighter.
With the tools in view, let's now walk through the core features built on top of them.
i18n: Multi-language Support in Next.js App Router
I wanted multi-language support from the start — both to carry over the experience of building it at a previous company, and because I hope this site becomes a contact point with international developers I connect with through LinkedIn or search. I designed the routing to be locale-friendly from day one.
Using the next-intl library with [locale] dynamic routing in the Next.js 16 App Router environment, I started with Korean (ko) and English (en).
Here's what I designed and wired in:
- Middleware-based auto-detection: Configured to detect the visitor's browser language (Accept-Language) and automatically redirect to the appropriate locale page.
- Path-preserving toggle: Clicking the language toggle in the Pinned GNB at the top right switches the language (
ko↔en) while keeping the current page path intact, usinguseRouterandusePathname.
Modern and Flexible Navigation (Rail & Sheet)
The layout is built as a responsive 2-column grid to work well for both desktop and mobile.
Analyzing the UntitledUI portfolio design I used as a reference helped me map out the structure early on — it was a big help in arriving at a solid initial approach. As shown in the screenshot below, the concept is Rail Navigation (icons + labels) on the left in place of a top header, with a banner-avatar header and content feed filling the center. I chose this as the base because it maximizes content area while keeping navigation always accessible.
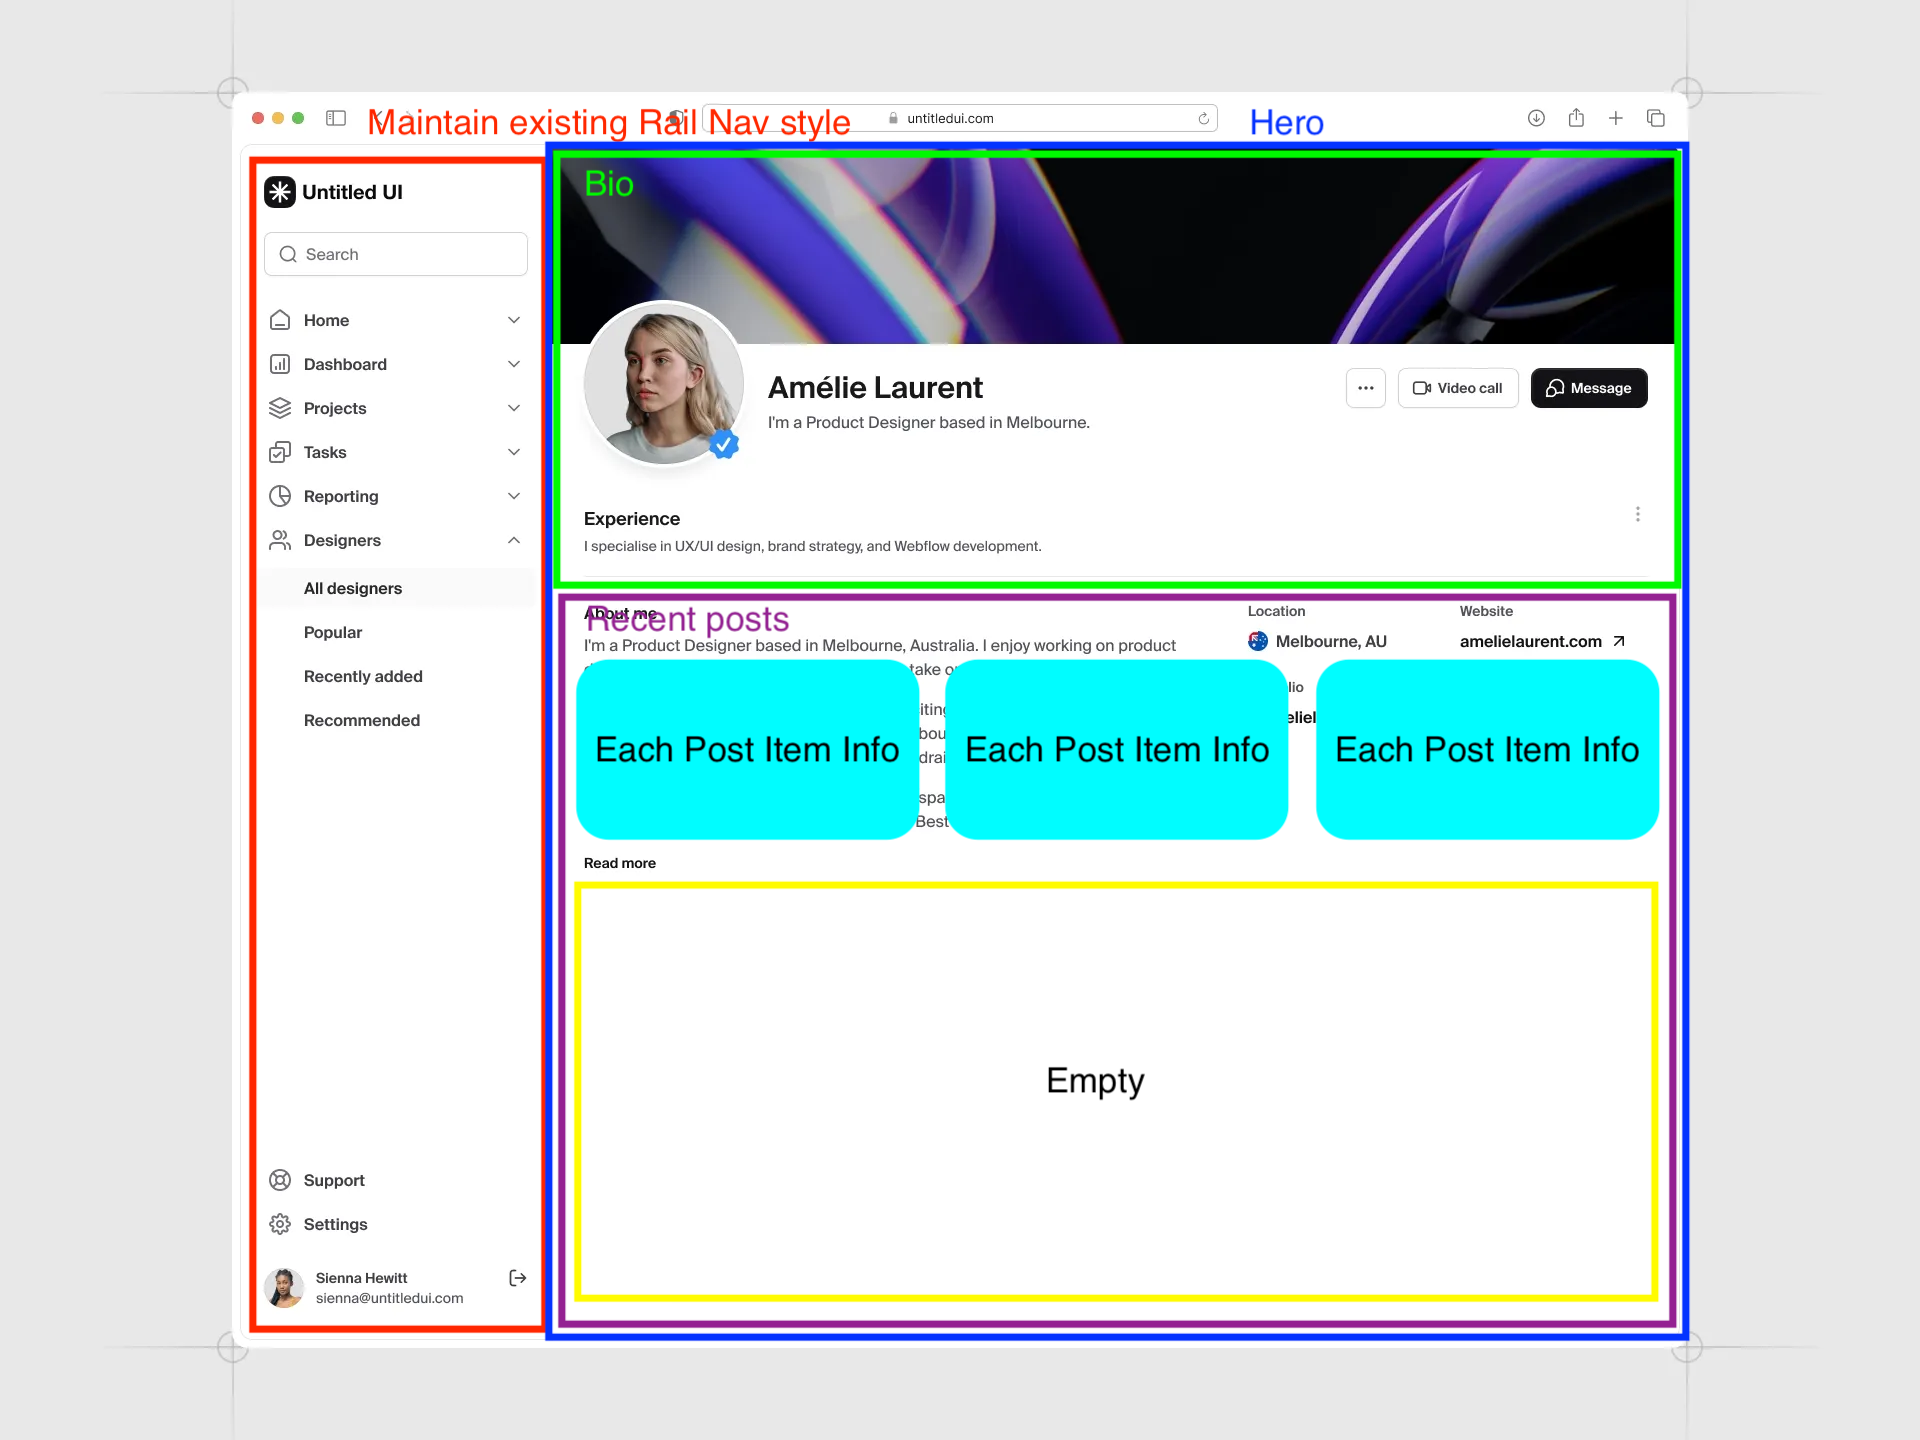
- Desktop (Rail Navigation): Adopted the Rail pattern from Material Design 3. Fixed to the left at 80px wide, it uses screen space efficiently while pairing icons and labels for intuitive navigation. Social links and a profile section sit at the bottom, with CSS-only tooltips for smooth interaction.
- Mobile (Header & Sheet): On mobile, the Rail is hidden in favor of a fixed top header and hamburger menu. Tapping the menu slides out the Sheet component from
shadcn/ui, keeping menu access consistent across screen sizes.
Building the MDX Content Pipeline
Rather than using a separate CMS or database, I designed posts to be managed as MDX (Markdown + JSX) files — the developer-friendly format.
- Parser & Highlighter:
gray-matterparses post metadata (frontmatter) andZodschemas strictly enforce types to guard against malformed posts. Code blocks combinerehype-pretty-codeandshikito naturally adapt to dark and light mode theme switches. - Static Site Generation (SSG): Via
generateStaticParams, all posts are statically generated at build time.
The Zod schema for frontmatter validation is set up like this:
export const frontmatterSchema = z.object({
  slug: z.string().min(1),
  title: z.string().min(1),
  description: z.string().min(1),
  category: z.enum(['tech', 'life']),
  tags: z.array(z.string()).default([]),
  publishedAt: z
    .string()
    .regex(/^\d{4}-\d{2}-\d{2}/, 'Must be YYYY-MM-DD format'),
  featured: z.boolean().optional(),
  series: z
    .object({ title: z.string(), slug: z.string(), order: z.number() })
    .optional(),
})
By enforcing type validation at build time, runtime bugs from malformed dates or invalid category values are caught before they ever reach production.
Detail-Oriented Post UX
Beyond simply displaying text, I added a number of small touches to make the reading experience itself more comfortable.
1. Automated Table of Contents
rehype-slug assigns IDs to heading tags, and IntersectionObserver highlights the section currently being read based on scroll position.
const observer = new IntersectionObserver(
  (entries) => {
    entries.forEach((entry) => {
      if (entry.isIntersecting) setActiveId(entry.target.id)
    })
  },
  {
    // Only activate when inside the middle 10% band of the viewport
    rootMargin: '-20% 0% -70% 0%',
  }
)
The key is rootMargin: '-20% 0% -70% 0%'.
With the default (0px), the TOC switches the moment a heading barely enters the viewport — far too twitchy.
Narrowing it to the "middle 10% band" means the active section only changes when you're genuinely reading it, giving a natural highlight as you scroll.
2. Reading Progress Bar & Estimated Reading Time
The thin line at the top tracking scroll progress, and the estimated reading time shown in the post header, give readers an intuitive sense of how far along they are and how much is left.
The progress bar batches updates with requestAnimationFrame instead of recalculating the DOM on every scroll event. If a rAF is already queued, the handler skips — no duplicate work.
const handleScroll = () => {
  if (rafId !== null) return // rAF already queued → skip
  rafId = requestAnimationFrame(() => {
    const total = document.documentElement.scrollHeight - window.innerHeight
    setProgress(total > 0 ? (window.scrollY / total) * 100 : 0)
    rafId = null
  })
}
window.addEventListener('scroll', handleScroll, { passive: true })
Adding passive: true tells the browser this listener will never call preventDefault(), so it doesn't have to block the scroll rendering pipeline.
Estimated reading time is calculated using the reading-time package.
const stats = readingTime(content)
const readingTimeMin = Math.ceil(stats.minutes)
How it calculates: The library detects CJK characters via Unicode ranges (Korean: U+AC00–U+D7A3) and counts each CJK character as an independent word. It then applies a uniform 200 words-per-minute (WPM) rate.
Accuracy and practicality: The average Korean adult reads at roughly 400–500 CPM (characters per minute), but this library effectively calculates at 200 characters/min — so Korean posts tend to be estimated ~2–2.5× longer than they actually take. English estimates at 200 WPM are much closer to reality.
For a personal blog, this characteristic isn't a real problem. Finishing faster than expected is a pleasant surprise for readers, and a conservative estimate beats an underestimate. Display format is split by locale:
- Korean: "5분 소요"
- English: "Read 5 min"
3. Tag-based Related Posts
Posts sharing tags with the current article are scored and displayed at the bottom — up to 3 — to give readers who've just finished something else worth exploring. Rather than a simple "show if tags overlap" filter, posts are ranked so that more overlap means a higher position.
function scorePost(current: Post, candidate: Post): number {
  const intersection = candidate.tags.filter((t) => current.tags.includes(t))
  return intersection.length
}

const related = allPosts
  .filter((p) => p.slug !== currentPost.slug)
  .map((p) => ({ post: p, score: scorePost(currentPost, p) }))
  .filter(({ score }) => score > 0)
  .sort((a, b) =>
    b.score !== a.score
      ? b.score - a.score
      : new Date(b.post.publishedAt).getTime() -
        new Date(a.post.publishedAt).getTime()
  )
  .slice(0, 3)
  .map(({ post }) => post)
When scores are tied, the more recent post wins. Because getAllPosts(locale) fetches only posts in the current language, Korean posts recommend Korean articles and English posts recommend English ones.
View Count: Cookie-less Tracking (Server Actions + Supabase)
I wanted to show how many times each post had been read since it was published — but without collecting personal information or setting cookies.
To store view counts, I chose Supabase, managing everything through Next.js Server Actions.
The database structure splits into two tables. post_views holds the cumulative view count per post; post_view_logs stores viewer records for 24-hour deduplication.
-- Cumulative view count per post
create table post_views (
  slug          text primary key,
  view_count    integer default 0,
  updated_at    timestamptz default now()
);

-- Viewer log for 24-hour deduplication
create table post_view_logs (
  id                  uuid primary key default gen_random_uuid(),
  slug                text not null,
  viewer_fingerprint  text not null,
  viewed_at           timestamptz default now()
);
The duplicate-check and count-increment logic is isolated in a Supabase RPC function (increment_post_view) — rather than making two round-trips from the application layer, the DB handles the transaction itself.
For "preventing duplicate views without collecting personal data or relying on cookies", I landed on generating a Viewer Fingerprint by hashing the request's IP, User-Agent, and Accept-Language together via SHA-256 inside the Server Action.
async function buildFingerprint(
  ip: string,
  ua: string,
  lang: string
): Promise<string> {
  const raw = `${ip}|${ua}|${lang}`
  const encoded = new TextEncoder().encode(raw)
  const hashBuffer = await crypto.subtle.digest('SHA-256', encoded)
  return Array.from(new Uint8Array(hashBuffer))
    .map((b) => b.toString(16).padStart(2, '0'))
    .join('')
}
The Web Crypto API (crypto.subtle) runs server-side with no extra packages — it works out of the box on both Node.js 20+ and Edge Runtime.
The Supabase RPC function uses this hash to check whether the same post was viewed within the last 24 hours; if so, the count stays flat. The result: reliable view tracking, no cookies left on anyone's browser.
Wrapping Up
Looking back while writing this post, the most striking thing wasn't that the tools wrote code for me — it was that they did much more than that. Shrimp Task Manager kept the task order clear; pairing the subagent with the output style let me stay in the driver's seat on design decisions. It struck the right balance: moving fast without losing the sense that I was actually building something.
In Part 3, I'll cover managing the portfolio with Notion as a CMS, a globally accessible Command Palette search built without a dedicated server, and the final stretch — Vercel deployment and SEO configuration.